

Visio has had Visual Basic for Applications (VBA) built into it since version 4.5, back in 1997, and a VBA macro recorder since version 2003. This feature can be an excellent productivity aid if you know how to use it, so I will explain a few fundamentals in this article, and invite you to follow up with further reading.
Some programmers are quite condescending about VBA because it has not had much development over the past few years, and there are newer, more capable, programming languages available. However, VBA has the great advantage that it is built into Visio, like all of the Microsoft Office applications, and can be stored in a Visio document. It is also very fast because it runs within the Visio process.
Now let's delve into a quick VBA macro example.
Switching on Developer Mode
Although I can access a list of available VBA macros from the VIEW \ Macros ribbon button, I always switch on developer mode by ticking FILE \ Options \ Advanced \ General \ Run in developer mode, or opening the Customize the Ribbon dialog from the right mouse menu in a clear part of the ribbon, and then ticking Developer in the Main Tabs tree view panel.
This displays the DEVELOPER tab in the ribbon, and the first group, labeled Code, contains the relevant buttons.
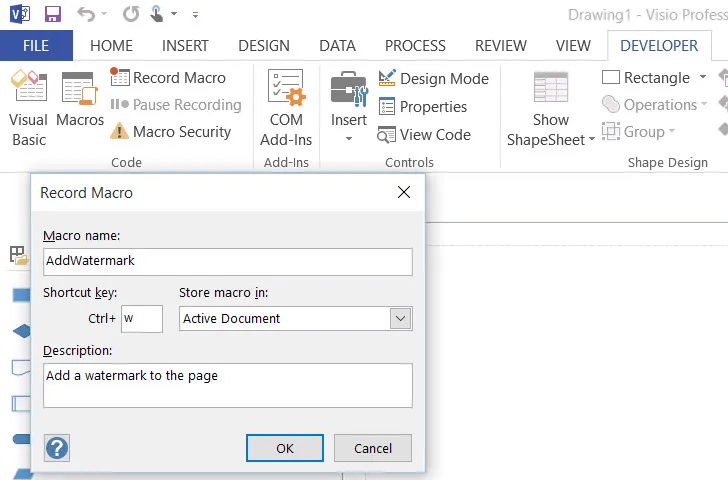
How to Record a VBA Macro
The Record Macro button opens a dialog where I can change the macro name from the default MacroX, add a description, assign a shortcut key, and select where to store the macro.
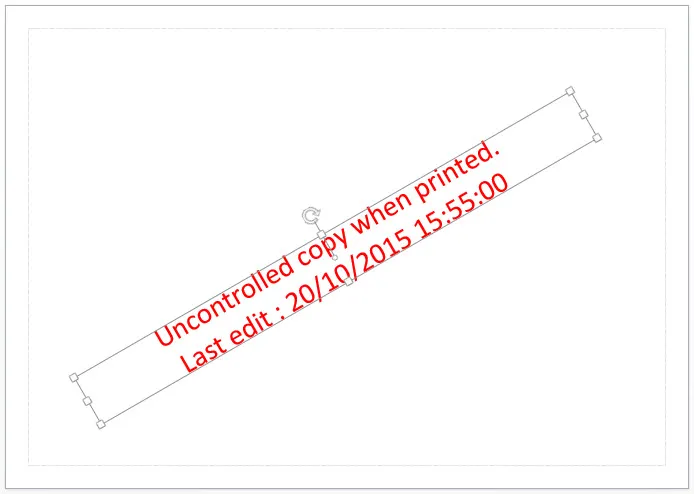
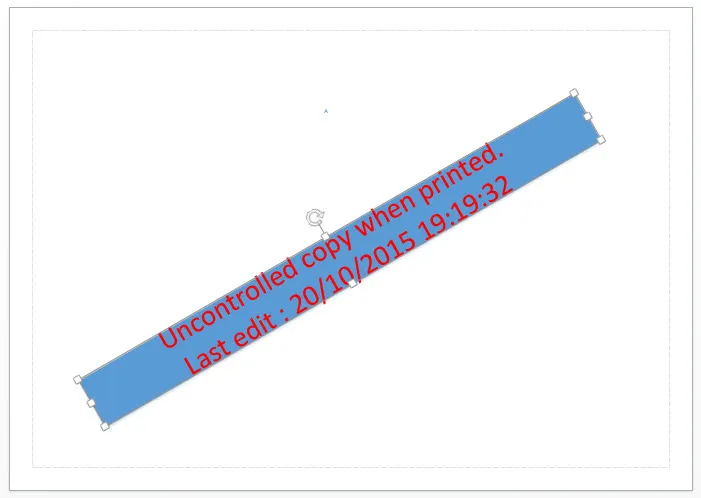
I want to create a watermark shape that I assign to a layer called Watermark. I can then change the Visible of the layer to False, but leave it Print as True. Therefore, a normal Visio user won’t see it until it is printed.
I used the INSERT \ Text button to enter some text, then INSERT \ Field to add the Last Edit Date formatted as date and time. I also rotated the text using the rotation handle, changed the Font Color to Red and used the Increase Font Size button several times. Finally, I assigned the shape to a layer called Watermark
Reviewing the Macro
Now that I have recorded the macro example, I can review it by clicking the DEVELOPER \ Code \ Visual Basic button or by pressing ALT+F11. The Visual Basic Editor (VBE) has a number of windows, and double-clicking the NewMacros item in the Project window opens it up in the code window.

There is just one module in this example, but I could add more, or even add Forms or Classes to the project. I have provided some useful links at the end of this article for further reading.
Note that text in Visio is just another shape, and that there is no AddText method, so the code uses DrawRectangle, and then attempts to remove any border and fill, before inserting the text that I typed.
I always have the Debug and Edit toolbar displayed, in addition to the Standard one.
The Watches window is useful for checking on variables whilst debugging, whilst the Immediate Window can be used whilst debugging, or at any time whilst Visio is running.
Running a Macro
So, I deleted the text that I just added, and ran the macro from the VIEW \ Macros \ Macros or DEVELOPER \ Code \ Macros button …
.webp)
Note that I could have edited the Options, but I didn’t, however the macro failed anyway, after a simple rectangle was drawn:

Debugging a Macro
So, I pressed the Debug button to highlight the line of code that caused the error.
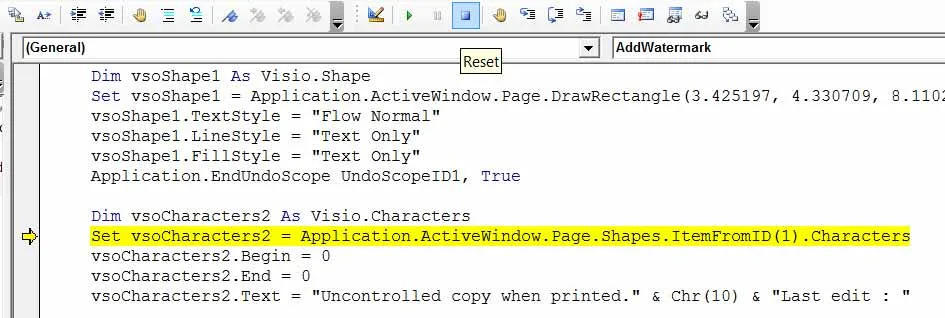
The macro recorder is a very active window, document, page centric, and creates very verbose and pedantic code at times. In this case, it is trying to use a shape with an ID of 1. Well, that was true the first time I created the shape, but not for subsequent runs. Fortunately, the macro recorder already created a reference to the required shape, vsoShape1, just a few lines earlier, but failed to re-use the reference. Therefore, I Reset the code, and replaced all instances of Application.ActiveWindow.Page.Shapes.ItemFromID(1) with vsoShape1. In fact, there were 96 such replacements in this module!
Part of the reason for this is that every time I pressed the Increase Font Size button, the recorder created unnecessary lines. I can delete all but the final set of lines from Dim UndoScopeIDx as Long to Application.EndUndoScope UndoScopeIDx, True.
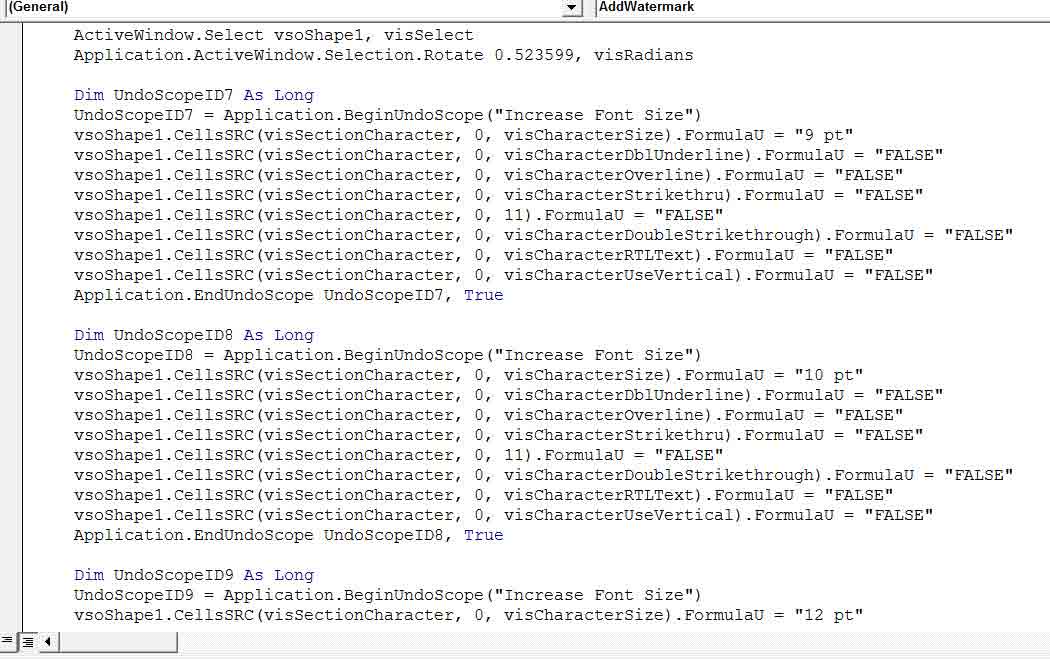
Even then, I could delete all of the lines, except the following in the final group to just one line, as all of the rest are superfluous:
vsoShape1.CellsSRC(visSectionCharacter, 0, visCharacterSize).FormulaU = "36 pt"
I also found similarly superfluous lines that were created when I tried different sizes and angles, so I deleted all but the final set.
Now, when I run the code, I get a blue rectangle with the red text that I wanted.
It appears that I did something that the macro recorder could not replicate. In this case, the rectangle is filled and has a line style. It seems that the following lines added by the recorder were not sufficient:
vsoShape1.LineStyle = "Text Only"
vsoShape1.FillStyle = "Text Only"
I recorded a new macro with the shape selected and I manually selected HOME \ Shape Styles \ Fill \ None and HOME \ Shape Styles \ Line \ None. This gave me the following macro:
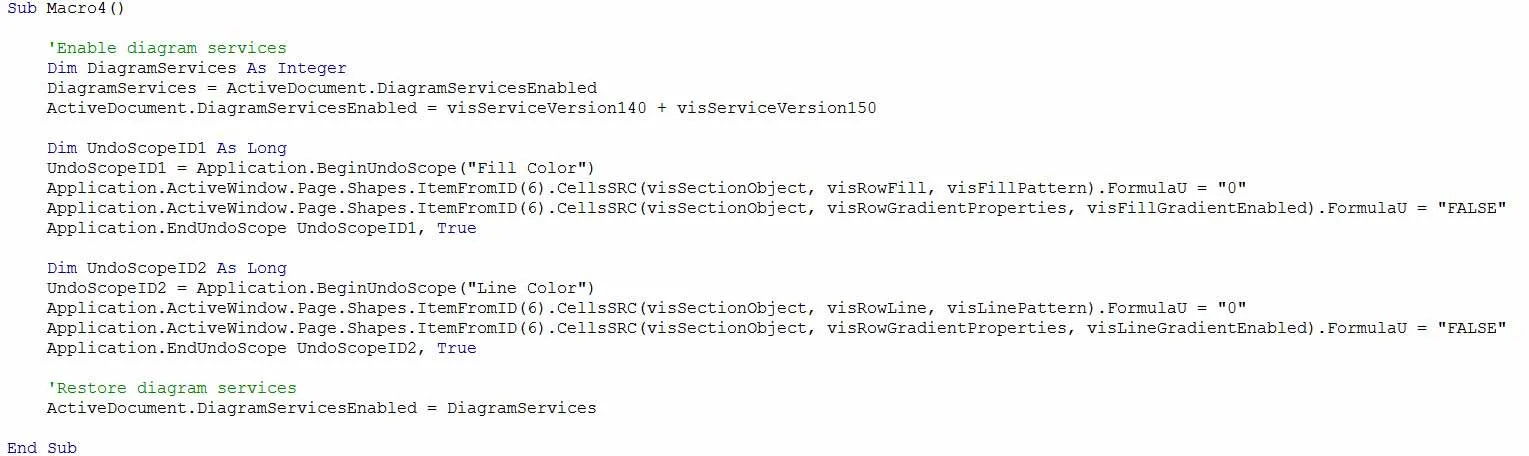
I copied the relevant lines from this macro, pasted into the first macro below the FillStyle line, and changed the shape reference to vsoShape1:
vsoShape1.CellsSRC(visSectionObject, visRowFill, visFillPattern).FormulaU = "0"
vsoShape1.CellsSRC(visSectionObject, visRowLine, visLinePattern).FormulaU = "0"
Now I can delete the temporary macro, and my original one does what I want, and could be used on any Visio document to add a watermark.
Where to Keep My Macros?
I created this VBA macro in the active document, but I cannot save a Visio 2013+ drawing with macros unless I save it as a macro-enabled drawing (*.vsdm). It is not usually a good idea to save macros in drawings because the code is carried with it, and if you want to re-use or edit the code, then you have to open the drawing document. Therefore, it is much better to save your macros in a macro-enabled stencil (*.vssm). This stencil can be opened read-only in the future, docked in any drawing document, and there is only one place to edit the code.
Useful Links
Visio VBA Reference: https://msdn.microsoft.com/en-us/library/office/ee861526.aspx
Visio 2013 SDK: https://www.microsoft.com/en-us/download/details.aspx?id=36825
Book excerpt – Understanding the ShapeSheet : https://msdn.microsoft.com/en-us/library/office/gg144579(v=office.14).aspx
Microsoft Developing Visio Solutions (old, but still excellent): https://msdn.microsoft.com/en-us/library/aa245244(v=office.10).aspx
Summary
In this article, I have demonstrated that whilst the Macro Recorder is useful, it is not perfect. It does, however, provide an insight to the workings of Visio, and, with some edits, you can begin to automate repetitive tasks, and therefore increase productivity. Experiment with your own macro examples to get the hang of this, and learn more VBA.

.webp)